PROMOTIONAL CONTENT WRTTEN BY CORTECO
Torsional Vibration Dampers (TVDs) provide vital protection for a vehicles engine. TVDs are made up of rubber and metal components; the rubber within the metal absorbs excessive vibrations that are leaked from the engine. These vibrations, if transmitted, can damage surrounding components causing them to fail prematurely. Having parts within the engine failing can cause significant damage to the vehicle.
We at Corteco thrive off the quality and expertise passed down by our parent company Freudenberg. We offer vibration control components and repair kits in OEM quality for more than 27,500 types of vehicles. All products are designed to meet the highest quality standards and are manufactured using the latest production methods.
This directly relates to our TVDs and we know that if you start to hear excessive noise coming from the engine or the vehicles is, vibrating excessively then you need to get your car into the garage. The steps below will show you how you can successfully remove and install a replacement TVD.
Step 1– The belt routing can be quite complex so we advise that you take a picture or draw a quick sketch of this.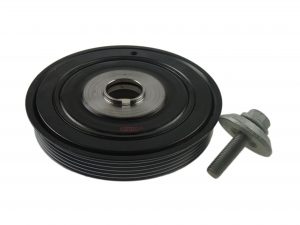
Step 2– Next we need to remove the tensioner from the belt, this can easily be done by rotating the pulley.
Step 3– To remove the TVD from the crankshaft you need to loosen the mounting bolts. As we know not everything is as straight forward and some TVDs are different.
If the TVD you are replacing has a central expansion bolt then you will need to block the flywheel, like most repairs on a vehicle all parts need to be replaced and this includes the central bolt.
If the TVD you are replacing doesn’t have a central bolt then this can be removed by holding the pulley and removing the mounting bolts. As always we recommend that all bolts are replaced with the TVD, Corteco offers complete TVD kits to make this possible.
Step 4– Unpack the new damper and place this on the engine.
Step 5– Now the new TVD is on we need to tighten the mounting bolts, if there are several bolts we recommend tightening alternate bolts and working them in a star pattern. Torque the mounting bolts to 1/3 of the installation torque.
Step 6– Before fully tightening the bolts we recommend you torque the mounting bolts to 2/3 and then continue to tighten them to the full torque as specified by the vehicle manufacturer in the manual.
Step 7– Before releasing the vehicle back to the customer, it is advised to inspect the front end auxiliary drive for wear and to replace any parts that are showing significant signs of stress. Ensure the belt has been re-fitted before starting the engine
Step 8– The final step to the installation and removal process is reloading the belt onto the tensioner by rotating the tensioner to the correct position. Ensure the belt has been re-fitted before starting the engine without doing so can cause significant damage.
As a pulley is seen as a crucial repair only quality products should be used, Corteco offers a lifetime warranty on all TVD kits, as we know they will not let you down.


Go to comments