PROMO ARTICLE ON BEHALF OF INDUCTION INNOVATIONS
![]()
The new Mini-Ductor® Venom™ induction heating tool improves workshop health & safety, saves time and reduces costs by being more efficient at removing rusted, corroded parts than by using a naked flame or other methods.
For example, corroded brake bleeder nipples are notoriously tricky to remove and it’s easy to accidentally break them off. Because of where the brake nipple is situated, using a torch is not really an option as the flame would melt the part and possibly the ball valve, with the risk of flammable brake fluid being released. Damage to the tyre, plastic trim and other ancillaries could well occur too.
The Mini-Ductor® Venom™ solves the problem
The tool uses bendable coils which provide good access to the part and fit around the nipple without touching it. The coil itself doesn’t get hot. The energy is created by an electromagnetic field between the two sides of the coil which creates a friction in the molecules of the metal which causes it to get hot. There will be some residual heat passed on to the coil, but it doesn’t actually get hot itself. This is one of the major USP’s of the tool as it means that wires and other components aside the area that is being heated don’t get damaged.
The process
Heat the part for around 15 seconds, which expands the nipple, then let it cool for around 20 seconds before attempting to remove it. This process may have to be repeated 2/3 times, but be patient and don’t be too heavy handed; a few minutes of using the Venom™ will save hours of grief and extra cost if the nipple breaks.
The step by step guide can be found below, but in the first instance it’s a good idea to clean the area and remove any corrosion with a wire brush. Ensure the coil you select is a good fit for the nipple, with the appropriate angle applied.
- Equipment needed: Heat resistant gloves, overalls, goggles and a respirator mask (if smoke will be produced from heating)
- Knowledge required: A well-reviewed proficiency of the tools safety and operating instructions.
Step 1: Fit Correct Size Coil
Coils come in different sizes.
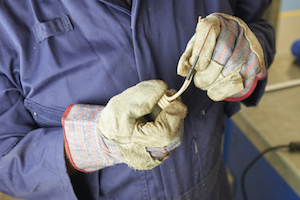
Step 2: Bend Coil to Correct Shape
Makes fitting easy.

Step 3: Attach Coil Using Twist Lock
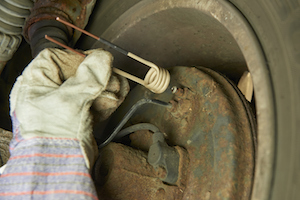
Step 4: Heat the Nut for 15-20 seconds
Be cautious not to overheat or turn red hot
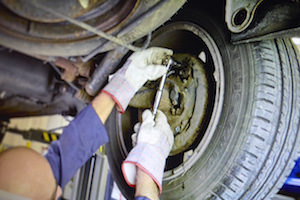
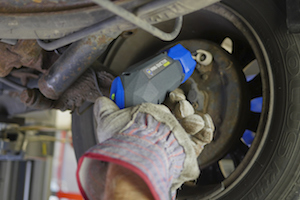
Step 5: Use a selected tool to unscrew the bleeder nut.
Dispose of excessively heated hardware.
To watch a video of this step by step guide, go to https://www.youtube.com/watch?v=FwG9s1b1A70
Special Offer
For the month of February 2017 all orders for the Mini-Ductor Venom will receive a free coil kit worth £125 + VAT.
To order, or to find out more about the Mini-Ductor® Venom™ and its wide variety of applications, call 01953 859138, email info@theinductor.co.uk, or visit http://www.theinductor.co.uk


Go to comments